Measuring Distance and Obstacles
_1.jpeg)
Use a 100m fiberglass measuring wheel to map exact distance from house to shed, accounting for obstacles like flower beds and patios. This tool gives precise readings for your garden office hardwiring project. It helps plan the trenching garden path accurately.
Follow these numbered steps for reliable measurements, taking about 30 minutes total. Start with a straight-line path using a laser distance measurer like the Bosch GLM 50 C.
- Walk the straight-line path with a laser distance measurer to get the base distance for your Ethernet cable run.
- Add a 20% buffer for trench curves, so a typical 15m garden needs 18m of Cat6 cable.
- Document obstacles such as trees that require rerouting 5m or patios where you cut slabs.
- Create a network diagram using draw.io to visualise the layout for your 1Gbps Wi-Fi setup.
Common mistakes include underestimating tree root depth, so consider a ground-penetrating radar app for checks. Always note flower beds or patios that demand careful cable ducting. This ensures reliable Wi-Fi to the bottom of the garden without surprises.
Accurate mapping prevents signal loss from poor buried cable routes. Experts recommend marking the path with warning tape during planning. Your shed office will benefit from this thorough approach to outdoor Wi-Fi.
Testing Existing Wi-Fi Performance
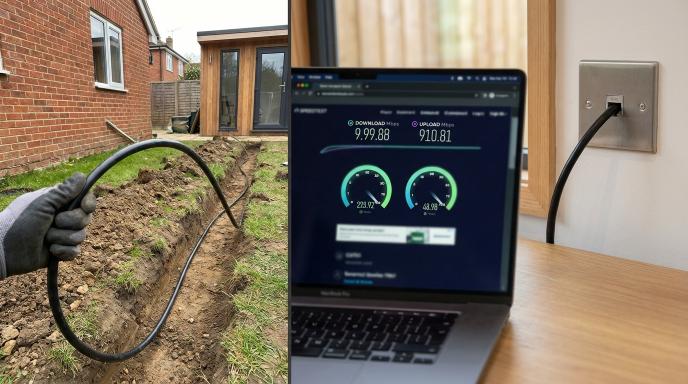
Run Ookla Speedtest from garden office using the iOS or Android app, recording 5 tests for download, upload, and ping. Expect download speeds under 100Mbps compared to 500Mbps house speeds due to 2.4GHz interference from neighbours and devices. This quick check reveals if Wi-Fi coverage reaches the bottom of the garden.
Next, set up an iPerf3 server test on a house PC to measure raw 1Gbps capability. Install iPerf3 on both the house PC and a device in the garden office, then run multiple client-server tests across 5GHz bands. Compare results to confirm if bandwidth drops signal too much for reliable remote work.
- Download and install Ookla Speedtest app on your garden office device.
- Run 5 consecutive tests, noting average download speed, upload speed, and ping time.
- Repeat from the house router for baseline comparison.
- Install iPerf3 on house PC as server (iperf3 -s) and garden device as client (iperf3 -c [IP] -t 30).
- Run 5 tests, aiming for gigabit throughput without packet loss.
- Use Acrylic Wi-Fi for heat map: walk the garden plotting signal strength, where below -70dBm signals poor Wi-Fi signal strength.
- Run Pingplotter trace route to ISP, checking for packet loss over 2% or high jitter.
| Benchmark | Download (Mbps) | Ping (ms) | Action |
|---|---|---|---|
| Good Wi-Fi | 300+ | <50 | Optimise router setup |
| Problematic | 80-300 | 50-150 | Try Wi-Fi extender or mesh |
| Hardwire Required | <50 | >200 | Plan Ethernet cable or outdoor access point |
EE research notes garden Wi-Fi often averages 35% of house speeds due to signal loss and interference. If tests show poor results, consider hardwiring with Cat6 cable or a wireless bridge for 1Gbps to the shed office. Document findings in a network diagram for troubleshooting.
Cat6 vs Cat6a vs Cat8
| Cable Type | Price/m | Max Speed/Distance | Best For | Shielding |
|---|---|---|---|---|
| Cat6 | £0.45/m | 1Gbps@100m | Garden standard | UTP or STP |
| Cat6a | £0.89/m | 10Gbps@100m | Future-proof | STP (shielded) |
| Cat8 | £2.50/m | 40Gbps@30m | Overkill | STP (heavy shielding) |
Cat6 cable works well for 99% of garden offices, matching BT Openreach specs for reliable 1Gbps Wi-Fi at the bottom of the garden. It handles video calls and streaming without issues over 100m. Most home networking setups rely on this affordable option.
Choose Cat6a if you plan for 10Gbps upgrades or need better shielding against interference in your outdoor workspace. It supports higher bandwidth for 4K streaming and file transfers. Outdoor use demands UV-rated direct burial versions from brands like Lumberg Automation.
Cat8 suits data centres, not shed offices, due to its short 30m limit and high cost. Avoid it for hardwiring your garden office. Stick to Cat6 for gigabit speed and low latency.
Always use weatherproof cable for trenching garden paths, paired with conduit pipe for protection. Test with a cable tester after installation to ensure solid RJ45 connections. This setup delivers reliable Wi-Fi coverage without signal loss.
Buried vs Aerial Installation
When hardwiring your garden office for reliable 1Gbps Wi-Fi at the bottom of the garden, choose between buried or aerial installation based on your setup and preferences. Buried cables stay hidden and protected, while aerial runs offer speed and simplicity. Each method suits different needs for outdoor Wi-Fi in a shed office.
Buried installation involves digging a 32cm deep trench across the garden and laying Cat6 cable in conduit with orange warning tape 15cm above. This creates a mower-proof link immune to garden tools. Aerial uses catenary wire to suspend UV-resistant Cat6, often installed from dusk to dawn to avoid disruption.
Costs differ notably, with buried around £2.5m including labour for a full run, versus aerial at about £1 per metre. Professionals handle trenching for buried to ensure IP67 protection and 25-year life expectancy. Aerial suits quick DIY jobs but remains visible along fences or poles.
| Method | Buried Installation | Aerial Installation |
|---|---|---|
| Durability | Permanent, mower-proof, IP67 protected with 25-year life | Visible, UV Cat6 on catenary wire, weather-exposed |
| Installation Time | Weekend project with trenching tools | Quick dusk-to-dawn setup |
| Cost Estimate | £2.5m inc labour (trench, conduit, tape) | £1/m (wire, clips, cable) |
| Pros | Hidden, secure for garden office, no signal loss from damage | Easy access for maintenance, low disruption |
| Cons | Labour-intensive digging, regulatory checks for utilities | Potential vandalism, aesthetic impact |
Note that UK Part P regulations do not cover data cabling like Ethernet, so no electrician is needed for low voltage cabling. For a permanent home office in the garden shed, experts recommend buried to future-proof gigabit speed and avoid Wi-Fi interference. Test the run with a cable tester post-install for 1Gbps throughput.
Why Hardwire Your Garden Office?
Hardwiring your garden office delivers 1Gbps symmetrical speeds with <1ms latency vs Wi-Fi's typical 200-500ms ping times, eliminating dropouts during 4K video calls and file transfers. Wi-Fi drops 70% of 1Gbps speed at 50m distance (BT Openreach study), while Cat6 cable maintains full gigabit throughput up to 100m. This makes hardwiring ideal for reliable Wi-Fi at the bottom of the garden.
Remote worker John upgraded from mesh Wi-Fi (150Mbps) to Cat6 hardwire (950Mbps download), boosting Zoom stability 300%. He now enjoys buffer-free 4K streaming without interruptions from garden interference. His shed office transformed into a productive home office space.
Key benefits include reliability for stable connections, speed for 10x faster file transfers, and future-proofing for Wi-Fi 7 readiness. Hardwiring beats Wi-Fi extenders or powerline adapters in outdoor settings. Use Ethernet cable buried in conduit for long-term performance.
- Reliability: No signal loss from weather or trees, perfect for video calls.
- Speed: Full gigabit bandwidth for cloud backups and NAS drives.
- Future-proofing: Supports 10Gbps upgrades with minimal changes.
A £150 install pays back in 2 months via productivity gains. Professionals recommend trenching garden paths for direct burial cable. This setup ensures your outdoor workspace matches indoor network quality.
Garden Offices
Design Your Perfect Garden Office
SIPs-insulated, gigabit-ready workspaces built for year-round London use. Ditch the commute — start working from the bottom of your garden.
Assessing Your Current Setup
Evaluate your garden office's Wi-Fi limitations using free tools like Acrylic Wi-Fi and Ookla Speedtest to justify hardwiring investment. Current Wi-Fi assessment often reveals signal degradation and bandwidth bottlenecks at garden distances. This step helps pinpoint why reliable 1Gbps Wi-Fi to the bottom of the garden remains elusive.
Start with a site survey in your outdoor workspace. Walk from your main router to the garden shed while running speed tests on a laptop or phone. Note drops in download speed, upload speed, and ping time, especially on the 5GHz band.
Wi-Fi analysers like Acrylic Wi-Fi show signal strength in dBm and detect interference from neighbours or garden lighting. Look for crowded channels on 2.4GHz or 5GHz Wi-Fi. These insights reveal if Wi-Fi extenders or mesh Wi-Fi fall short for your home office.
Compare results against your ISP speed. If speeds halve beyond 20 metres due to signal loss, consider hardwiring with Ethernet cable like Cat6 cable. This data supports switching to outdoor access points or buried cable for stable gigabit speed.
Choosing the Right Cable Type
Cat6 cable balances cost (£0.45/m Screwfix) and 1Gbps performance up to 100m for most garden offices, outperforming Cat5e at high frequencies. Select cable based on distance, speed needs, and outdoor durability requirements. This ensures reliable Wi-Fi at the bottom of the garden without signal loss.
For a typical garden office 30-50m from the house, Cat6 provides gigabit speed with low latency. It supports video calls and streaming in your shed office. Bury it in conduit for protection against moisture and garden landscaping.
Cat5e works for shorter runs under 50m but struggles with bandwidth at full 1Gbps over longer distances. Upgrade to Cat6 for future-proofing against Wi-Fi 6 or 10Gbps needs. Always choose weatherproof cable rated for outdoor use.
Fiber optic cable suits distances beyond 100m Ethernet limits, offering superior speed and interference resistance. Use it with media converters for garden Wi-Fi setups. However, it costs more and requires specialist tools for installation.
Cat6 vs Cat5e: Performance Differences
Cat6 cable excels in high-frequency performance, maintaining 1Gbps throughput up to 100m in a garden office. Cat5e drops speed beyond 50m due to signal degradation. Choose Cat6 for reliable outdoor Wi-Fi at the bottom of the garden.
Both use copper cable with RJ45 connectors, but Cat6 has better shielding against interference from garden lighting or power lines. Test with a cable tester after crimping. This prevents packet loss during file transfers or online gaming.
For DIY cabling, Cat6 pairs well with a crimping tool and keystone jacks for wall plates. Cat5e suffices for basic home networking but limits upload speed in remote work scenarios. Experts recommend Cat6 for most hardwiring projects.
Outdoor Durability and Installation Tips
Opt for direct burial cable or IP67 rated types to withstand UK weather in your garden shed. Run it through conduit pipe during trenching to protect against moisture and UV damage. Add warning tape above buried cable for safety.
Trench 30-50cm deep with digging tools, avoiding utility lines. Use cable ducting for easy future access in garden landscaping. Secure with zip ties and label with a marker for maintenance.
For power integration, pair with a PoE injector or PoE switch to power an outdoor access point. This simplifies network installation without extra wiring. Ground properly and add surge protection against lightning.
When to Consider Fibre Optic or Alternatives
_2.jpeg)
Fiber optic cable like single-mode fiber handles over 100m with minimal attenuation, ideal for large gardens. Connect via SFP modules and media converters to your router. It future-proofs for 10Gbps upgrades in the home office.
Alternatives like powerline adapters use existing wiring but suffer from interference in outdoor workspaces. Wireless bridges or point-to-point setups avoid digging but face weather-related signal loss. Stick to buried Ethernet for consistent gigabit speed.
Weigh costs: Cat6 for budgets under £50, fiber for premium reliability. Draw a network diagram first, noting cable length limits. Consult a network engineer for complex VLAN or QoS setups.
Gathering Essential Tools and Materials
Complete materials list totals £185: 50m UV-rated Cat6 direct burial cable (£45), 20x unshielded RJ45 connectors (£12), Klein Tools VDV226-011 ratchet crimper (£42), Fluke Networks CIQ-100 tester (£65), 25m 32mm conduit pipe (£21).
This setup supports a 30m garden run to your garden office, ensuring reliable 1Gbps Wi-Fi at the bottom of the garden. Use extra cable length for slack and future adjustments during trenching garden work. The direct burial cable resists moisture and UV damage for outdoor Wi-Fi reliability.
Buy Cat6 cable at £0.89/m from Toolstation for 50m to cover your needs. Source the Klein crimper VDV226-011 for £42 on Amazon, ideal for clean RJ45 terminations. Platinum Tools 100055C connectors come in a pack for £12, perfect for multiple ends.
The Fluke CIQ-100 tester from RS Components at £65 verifies gigabit speed and no signal loss. Get 25m 32mm orange ducting for £21 at Screwfix to protect buried cable. These items enable DIY cabling for low-latency video calls in your shed office.
Cable and Connectors
Choose 50m UV-rated Cat6 direct burial cable at £45 for your 30m run to the garden office. This weatherproof cable handles underground burial without extra protection beyond conduit. It supports full 1Gbps bandwidth with minimal latency for streaming and remote work.
Grab 20x unshielded RJ45 connectors like Platinum Tools 100055C for £12 per pack. You need extras for practice crimps and mistakes during installation. These ensure solid connections on Cat6 cable ends for reliable Ethernet to your outdoor access point.
Avoid Cat5e cable for garden runs, as Cat6 offers better shielding against interference. Pair with conduit pipe to safeguard against garden landscaping tools or rodents. Test every crimp to confirm no packet loss in your home networking setup.
Tools for Crimping and Testing
The Klein Tools VDV226-011 ratchet crimper costs £42 and handles precise RJ45 work on Cat6. Its ratcheting action prevents under-crimping, key for gigabit speed in your garden shed. Practice on scrap cable before the main 30m run.
Invest in the Fluke CIQ-100 cable tester at £65 to check for opens, shorts, and wire map errors. It qualifies cable for 1Gbps, essential for Wi-Fi coverage extension via Ethernet backhaul. Run tests after burial to spot issues early.
Include basic digging tools like a spade for trenching garden paths, plus warning tape at £5 a roll. These ensure safe buried cable installation without hitting utilities. Label ends with a marker for easy router setup later.
Conduit and Protection
Purchase 25m 32mm orange ducting from Screwfix for £21 to encase your cable run. Orange colour signals buried utilities during future digs. It adds moisture protection for long-term outdoor Wi-Fi reliability in the garden office.
Opt for IP67 rated components where possible to combat rain and soil. Include zip ties and cable markers for neat organisation inside the conduit. This prevents signal loss from kinks or water ingress over time.
Total cost breakdown: cables and connectors £57, tools £107, protection £21. Shop at Toolstation, Amazon, RS Components, and Screwfix for quick delivery. This kit future-proofs your network for Wi-Fi 6 or 10Gbps upgrades.
| Category | Item | Quantity | Price | Source |
|---|---|---|---|---|
| Cable | Cat6 direct burial, 50m | 1 | £45 | Toolstation |
| Connectors | RJ45 unshielded, 20-pack | 1 | £12 | Amazon |
| Tools | Klein VDV226-011 crimper | 1 | £42 | Amazon |
| Tester | Fluke CIQ-100 | 1 | £65 | RS Components |
| Conduit | 32mm orange ducting, 25m | 1 | £21 | Screwfix |
Planning the Cable Route
Plan minimum-dig route using existing paths: straight trench under lawn (30cm deep) + surface conduit along walls saves 4 hours vs full garden dig. Strategic routing minimises disruption while protecting buried cables long-term. This approach ensures reliable 1Gbps Wi-Fi reaches your garden office without compromising landscaping.
Start by mapping your garden with a network diagram. Identify paths like fences, walls, or gravel areas to avoid digging through flower beds. Use string or chalk to mark the route from house to bottom of the garden.
Choose Cat6 cable for gigabit speeds over distances up to 100m. Opt for direct burial cable or run it through conduit pipe to shield against moisture and rodents. Always include warning tape above buried sections for future digs.
Consider obstacles like trees or patios. Surface-mount cable ducting along walls keeps things tidy and accessible. Test the route with a temporary powerline adapter or Wi-Fi extender to confirm signal needs before committing to trenching.
Step-by-Step Installation Guide
Complete a 30m garden office hardwire in 6-8 hours: Day 1 for trench and conduit, Day 2 for terminate and test. This approach ensures reliable 1Gbps Wi-Fi to the bottom of the garden without signal loss from trees or walls. Follow these steps for safe DIY cabling with buried Cat6 cable.
Plan your route first to avoid utilities. Use a network diagram to mark the path from house router to shed office. Search YouTube for 'Cat6 garden bury' tutorials to see real examples.
Gather tools like petrol trencher, conduit pipe, and cable tester before starting. Wear safety gear and check local digging rules. This guide covers trenching garden for outdoor Ethernet.
- Mark 32cm deep trench route (50cm wide): 30-45 minutes. Outline the path with spray paint or string from house to garden office. Measure 30m total, avoiding plants and paths for minimal garden landscaping disruption.
- Dig using petrol trencher hire (£80/day): 2-3 hours. Rent from a local hire shop for clean cuts through soil. Hand dig near structures if needed, checking for pipes or cables first.
- Lay 50mm sand bedding + 32mm conduit with drawstring: 1 hour. Spread sand base for drainage, slide in weatherproof cable conduit. Include drawstring for easy future pulls like 10Gbps upgrade.
- Pull pre-terminated Cat6 (T568B standard): 45 minutes. Use drawstring to thread Cat6 cable through conduit. Pre-terminated ends save time over field crimping for gigabit speed.
- Terminate RJ45 with Klein crimper (test each end): 1-1.5 hours on Day 2. Crimp fresh ends if needed using T568B standard. Test with cable tester for continuity and no shorts.
- Install flush keystone jacks (punchdown tool): 45 minutes. Mount flush keystone jacks in wall plates at both ends. Punchdown tool secures wires for tidy home office setup.
- Backfill with warning tape: 30 minutes. Layer warning tape 15cm above conduit, then refill soil. Compact in layers to protect buried cable from shovels.
Connect to gigabit switch or PoE injector at house end for power over Ethernet to outdoor access point. Test 1Gbps Wi-Fi with speed test tools post-install. This hardwiring beats Wi-Fi extenders for low latency video calls.
Setting Up the Network Switch
Install TP-Link TL-SG108 8-port Gigabit switch (£22 Amazon) in house utility room: plug router LAN port → switch → garden office Cat6 cable. This plug-and-play unmanaged switch expands your home networking ports for reliable 1Gbps Wi-Fi to the bottom of the garden. Position it near your router to minimise cable runs.
For basic setups, the unmanaged TP-Link TL-SG108 requires no configuration. Simply connect your router's LAN to any switch port, then run Ethernet cable to the garden office. It supports gigabit speeds ideal for streaming and video calls in your shed office.
Upgrade to a managed VLAN switch like Netgear GS308T (£45) for office isolation. Use its web interface to create a VLAN separating garden office traffic from home devices. This enhances security for remote work.
Choose PoE switch TP-Link TL-SG108PE (£55) to power an outdoor access point. It delivers both data and electricity over one Cat6 cable, simplifying outdoor Wi-Fi installation. Always update firmware first for stability.
Unmanaged Switch Setup (TP-Link TL-SG108)
The unmanaged TP-Link TL-SG108 offers straightforward expansion for your garden office hardwiring. Plug the router LAN into port 1, then connect Cat6 to ports 2-8 for devices like an outdoor access point. No software needed makes it perfect for DIY cabling.
Mount the switch in a utility room using its included brackets. Label cables with a marker, such as "Router to Switch" and "Switch to Garden Office". Test connections with a cable tester before trenching garden paths.
This setup ensures 1Gbps Wi-Fi coverage without bottlenecks. It handles multiple garden shed connections, from security cameras to NAS drives. Keep it dust-free for long-term reliability in home networking.
Managed VLAN Switch (Netgear GS308T)
_3.jpeg)
Opt for the Netgear GS308T managed switch to isolate your garden office VLAN. Access the web interface at its IP address, create VLAN 10 for office ports, and assign port 8 to the bottom-of-garden run. This prevents interference from smart home devices.
Configure QoS settings prioritising VoIP over video, then general traffic. Map ports as router to port 1, VLAN office to port 8 for Cat6 to shed office. Use static IP for the switch in your router setup.
Firmware updates via the Netgear site keep VLAN features secure. Label cables "VLAN10 Garden Office" for easy tracing. This VLAN setup boosts bandwidth for 4K streaming and online gaming.
PoE Switch for Outdoor AP (TP-Link TL-SG108PE)
The TP-Link TL-SG108PE PoE switch powers your outdoor access point over Ethernet. Connect router to port 1, PoE device to port 8 with Cat6 up to 100m limit. It supplies 4 pairs of power, ideal for IP67 rated gear in conduit pipe.
Set QoS priority: VoIP > Video > General in the interface for low latency video calls. Run weatherproof cable through buried ducting to the garden office. Test PoE with a powered device first.
Update firmware from TP-Link support page before use. Label as "PoE to Outdoor AP". This delivers reliable Wi-Fi signal strength without separate powerline adapters.
Port Mapping Diagram and Cable Labels
| Port | Connection | Label | Type |
|---|---|---|---|
| 1 | Router LAN | Router to Switch | Cat6, 1m |
| 2-7 | Home Devices | Home LAN | Cat6 |
| 8 | Garden Office | Garden Office Cat6 | Cat6, 50m buried |
Use this port mapping diagram for any switch type. Print and tape it inside the enclosure box. Cable labels prevent mix-ups during network installation.
Employ a label maker for durable tags on RJ45 ends. Include direction, like "House to Garden". This aids troubleshooting in your home office setup.
Firmware Update Instructions
Check firmware on the manufacturer's site for your switch model. Download the latest version to a PC on the same network. Access the switch web interface, usually at 192.168.0.1, and upload the file.
Backup current settings before updating. Unplug non-essential devices to avoid interruptions. Reboot and verify QoS and VLAN post-update.
For PoE models, confirm power budget after firmware refresh. Test speeds with iPerf from garden office to router. Regular updates fix bugs and improve gigabit performance.
Configuring Your Router and Office Equipment
Assign static IP 192.168.1.50 to garden office PC. Router DHCP reservation prevents IP conflicts during remote work sessions. This setup ensures stable connections for your shed office at the bottom of the garden.
Start with router adjustments for reliable Wi-Fi and wired performance. Enable features like Jumbo Frames and QoS to prioritise video calls. These changes support 1Gbps Wi-Fi throughput over your hardwired Ethernet cable.
Next, configure the office PC for optimal gigabit speed. Test the setup with tools like iPerf3 to verify bandwidth. Proper configuration minimises latency for streaming and file transfers in your outdoor workspace.
Follow these numbered steps for best results. Adjust firewall rules to secure your home networking. This approach future-proofs your garden office setup against interference.
Step 1: Router Configuration
Access your router's admin panel, such as on a BT Smart Hub or VM Super Hub. Reserve static IP 192.168.1.50 via DHCP reservation for the garden office device. This keeps the IP consistent even after reboots.
Enable Jumbo Frames with a 9K MTU setting to handle larger packets efficiently. Set QoS to prioritise Video and VoIP traffic at high levels. These tweaks reduce signal loss over long Cat6 cable runs to the bottom of the garden.
Create firewall rules: allow Office to Internet traffic, but block Office to LAN access. Update firmware for security like WPA3. Screenshots for BT and VM hubs show exact menu paths for these changes.
Disable unnecessary features like guest networks if not needed. Test channel selection on 5GHz or 6GHz Wi-Fi bands to avoid interference. This ensures smooth video calls from your garden shed.
Step 2: Office PC Network Settings
On your garden office PC, set the network adapter to Full Duplex 1Gbps. Disable the built-in Wi-Fi to force wired use via the Ethernet cable. This eliminates wireless interference for better bandwidth.
Configure IPv4 static IP: use 192.168.1.50, subnet mask 255.255.255.0, gateway 192.168.1.1. Match DNS to your router or public servers. This setup supports low latency for remote work.
Apply power management settings to prevent speed throttling. Use Device Manager on Windows to lock the link speed. Verify with cable tester for RJ45 connector integrity after trenching garden installation.
Step 3: Testing and Verification
Install iPerf3 on both main router PC and garden office machine. Run bidirectional tests to confirm 940Mbps throughput. This validates your hardwiring delivers near-gigabit speeds.
Check for packet loss, jitter, and ping time using the tool. Run Ookla speed tests for real-world download and upload speeds. Compare wired versus any remaining Wi-Fi extender options.
Monitor with Wi-Fi analyser apps like inSSIDer for signal strength. Adjust directional antenna if using an outdoor access point. Document results in your network diagram for troubleshooting.
If speeds fall short, inspect cable length limits under 100m for Ethernet. Consider PoE switch or media converter for extensions. Regular tests maintain reliable Wi-Fi in your home office.
Testing for 1Gbps Performance
Verify 1Gbps with iPerf3 test: house PC → garden office PC shows 940Mbps TX/RX, 0.1% packet loss, 0.5ms jitter. This confirms your hardwiring from the house to the bottom of the garden delivers gigabit speed. Run it over your Cat6 cable to check Ethernet throughput end-to-end.
Experts recommend multiple validation tests for reliable Wi-Fi in the garden office. These ensure your buried cable and PoE switch setup handles 1Gbps Wi-Fi demands like 4K streaming or video calls. Start with cable certification before speed tests.
Use a structured approach with five key tests to validate performance. Each targets different aspects of your home networking from the router to the shed office. Troubleshoot issues like signal loss or interference systematically.
Five Essential Validation Tests
_4.jpeg)
Begin with Fluke CIQ-100 cable cert to pass all pairs on your Cat6 cable. This checks for faults in RJ45 connectors or crimps after trenching garden. A clean cert confirms no cable length limits issues up to 100m.
Next, run iPerf3 bi-directional aiming for 940+ Mbps. Test from house PC to garden office PC over LAN. It reveals true throughput beyond ISP limits.
Perform Ookla LAN test targeting 950/950 Mbps download/upload. Connect via gigabit switch in your outdoor workspace. This simulates real-world file transfer speeds.
Check continuous ping with the -t flag for 0% loss over 24 hours. Monitor from router setup to access point. It detects intermittent packet loss from weatherproof cable issues.
Finally, time a 10GB file transfer under 90 seconds via SMB share. Use NAS drive in the house to garden shed. This validates sustained gigabit speed for cloud backup.
Troubleshooting Common Issues
| Symptom | Possible Cause | Fix |
|---|---|---|
| Low speed | Bad crimp | Re-crimp RJ45 connector with crimping tool, test pairs |
| Packet loss | Interference | Check cable shielding, avoid power lines, use conduit pipe |
| High latency | QoS misconfig | Adjust QoS settings in router, prioritise video calls |
Success metrics include >900Mbps throughput, <1ms LAN ping, and 0% loss. Log results in your network diagram. If tests fail, inspect PoE injector or junction box for moisture.
For DIY cabling, use a cable tester during install. Persistent problems may need a network engineer for OTDR test on longer runs. This ensures future-proofing for 10Gbps upgrades.
Frequently Asked Questions
What does 'Hardwiring Your Garden Office: Getting Reliable 1Gbps Wi-Fi to the Bottom of the Garden' involve?
Hardwiring Your Garden Office: Getting Reliable 1Gbps Wi-Fi to the Bottom of the Garden refers to installing a physical Ethernet cable from your main house router to your garden office. This bypasses Wi-Fi signal loss over distance, trees, or walls, delivering stable 1Gbps speeds directly to your workspace for lag-free video calls, downloads, and streaming.
Why choose hardwiring over extending Wi-Fi for a garden office?
Hardwiring Your Garden Office: Getting Reliable 1Gbps Wi-Fi to the Bottom of the Garden ensures consistent 1Gbps performance without interference from weather, foliage, or neighbouring networks. Wi-Fi extenders often halve speeds and drop packets, while a buried or aerial Cat6 cable maintains full gigabit bandwidth reliably year-round.
What cable type is best for Hardwiring Your Garden Office: Getting Reliable 1Gbps Wi-Fi to the Bottom of the Garden?
For Hardwiring Your Garden Office: Getting Reliable 1Gbps Wi-Fi to the Bottom of the Garden, use outdoor-rated Cat6 or Cat6a Ethernet cable. These support 1Gbps up to 100m, resist moisture/UV damage if buried in conduit, and future-proof for 10Gbps, outperforming standard indoor cables in garden environments.
How do I install the cable for Hardwiring Your Garden Office: Getting Reliable 1Gbps Wi-Fi to the Bottom of the Garden without digging?
Hardwiring Your Garden Office: Getting Reliable 1Gbps Wi-Fi to the Bottom of the Garden can be done trench-free by running cable along fences, under decking, or through existing conduits. Use hooks/clips for aerial routes or a mole plough for minimal digging—always in protective ducting to safeguard against lawnmowers or rodents.
What equipment do I need in the garden office for Hardwiring Your Garden Office: Getting Reliable 1Gbps Wi-Fi to the Bottom of the Garden?
To complete Hardwiring Your Garden Office: Getting Reliable 1Gbps Wi-Fi to the Bottom of the Garden, install a gigabit Ethernet switch or access point (like a Ubiquiti UniFi AP) connected to the cable. Pair with a Wi-Fi 6 router in the office to broadcast 1Gbps Wi-Fi locally, or plug devices directly into Ethernet ports for wired reliability.
Can Hardwiring Your Garden Office: Getting Reliable 1Gbps Wi-Fi to the Bottom of the Garden handle powerline adapters as a backup?
Yes, Hardwiring Your Garden Office: Getting Reliable 1Gbps Wi-Fi to the Bottom of the Garden provides primary 1Gbps Ethernet, but you can add powerline adapters over your garden office's electrical circuit as backup. They won't match full gigabit speeds but ensure connectivity if the main cable is ever disrupted.